In this article, I will explain an Oempro use case to warm-up your sender domains and IP addresses with your active audience.
We will be utilizing the following features in Oempro;
- Multiple user accounts
- Multiple user groups
- Multiple delivery servers
- Enforced list MFROM email address
- MFROM override by list sender info email address
- Repeated autoresopnders
- Subscriber list webhooks
Features used in this use case require minimum Oempro v5.0.0 final release or higher version.
Our purpose
Setting up a robust email delivery system is a challenging and time taking process. It requires a perfect email delivery server setup, clean sender domains, and IP addresses, policy compliance, various testing, etc.
But besides that, it also requires a consistent warm-up process to make sure that you introduce your new sender identity to ISP’s and spam filters in the right way.
Do not confuse the email warm-up process with the email warm-up services that are available in the market. I never recommend using such a service due to various reasons. I will write another article explaining this soon.
The warm-up process is usually overseen or the deserved attention is not given to it. However, it’s what makes an email delivery system a perfect one.
Everyone can easily set up the technical side of the email delivery system which is all about setting servers, IP addresses, sender domains, policies, etc. But only a few continue with the second step which is as important as the first step: The warm-up process.
What does the email warm-up process mean?*
The email warm-up process is a way to build a sender reputation for a new sender domain and/or sender IP address and increase the email delivery sending capacity over time.
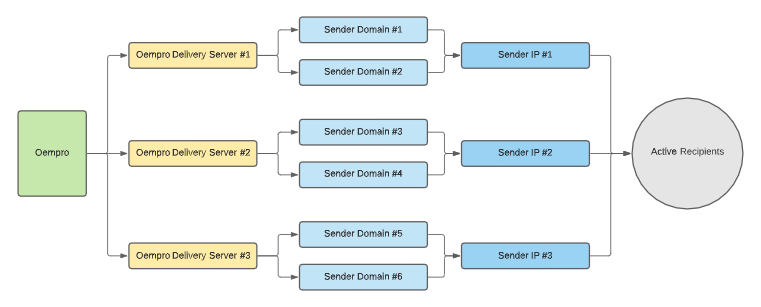
Setting up delivery servers
Just to make things easier to understand, I will explain the process with an example. Therefore, let’s say we have three sender domains and three sender IP addresses to warm up:
Sender domains to warm-up:
Sender IP addresses to warm-up:
- 100.100.100.101
- 100.100.100.102
- 100.100.100.103
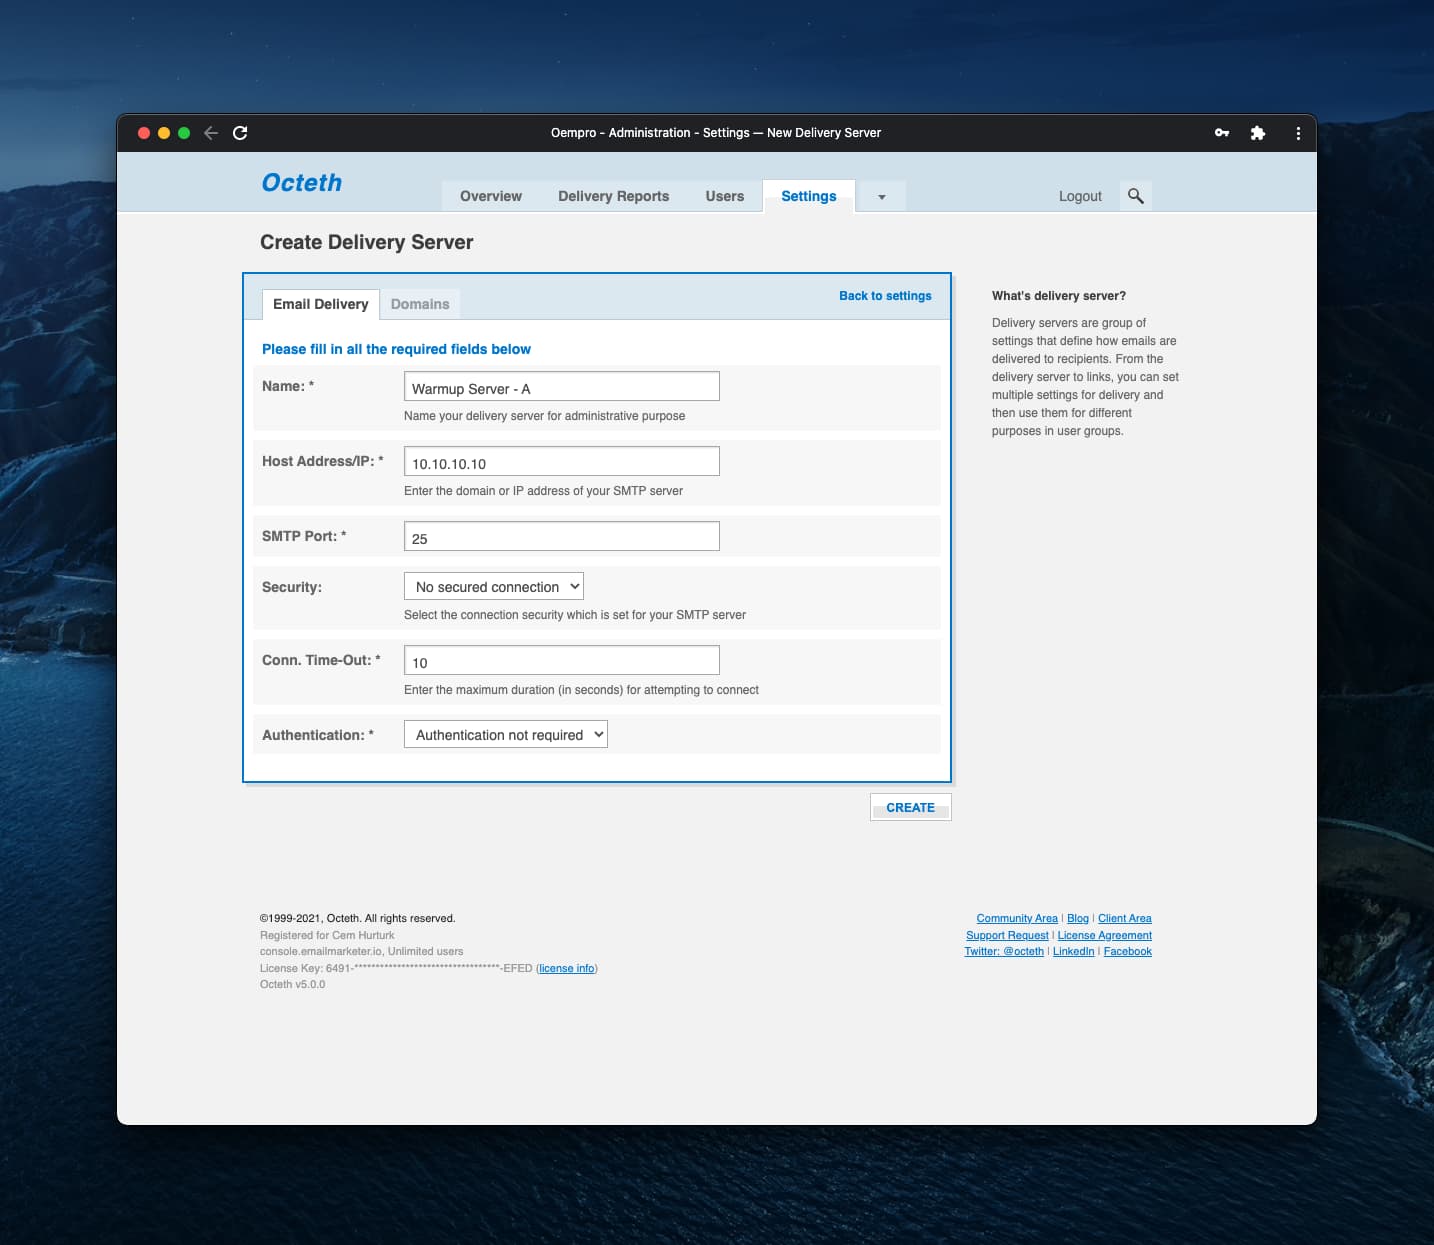
In this step, we will go ahead and create three delivery servers in Oempro. To do this, login to your Oempro Administrator area and go to [Settings] > [Delivery Servers].
Create a new delivery server, enter SMTP credentials;
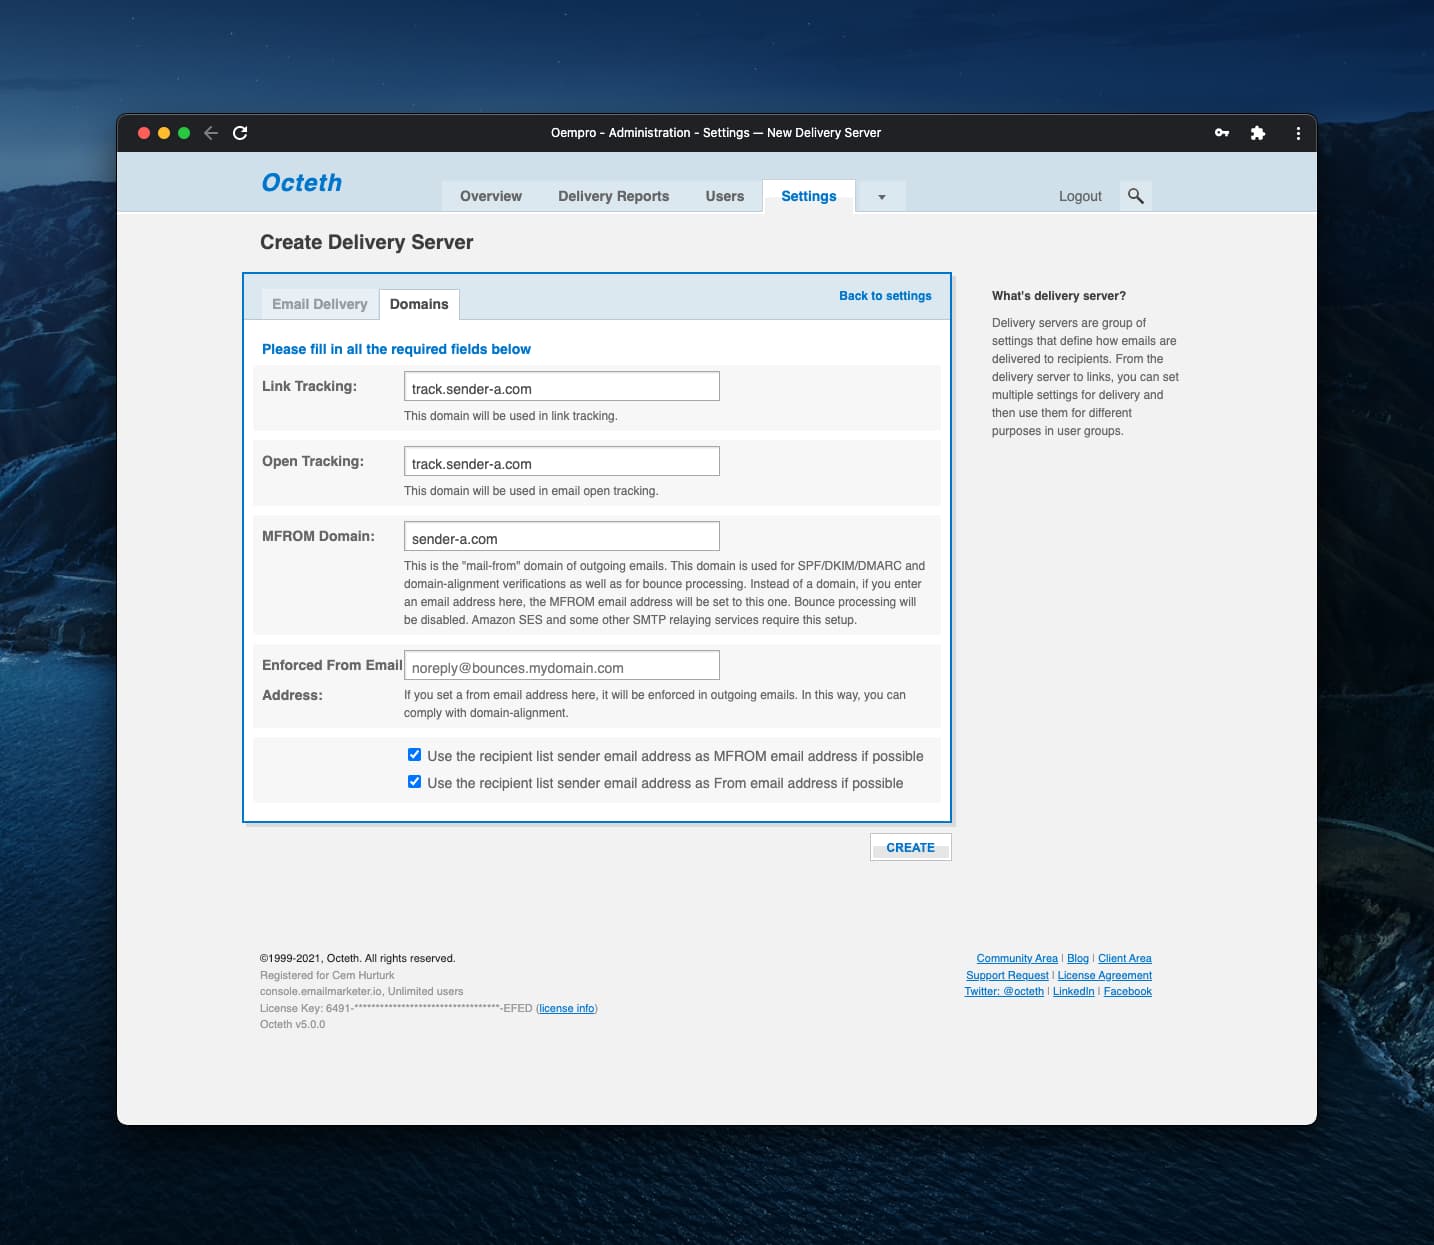
and domain settings;
Repeat this process and create separate delivery servers for all your sender domains and/or sender IP addresses.
Setting up user groups
Once your delivery servers are ready, the next step is to create a user group for each delivery server you have just created.
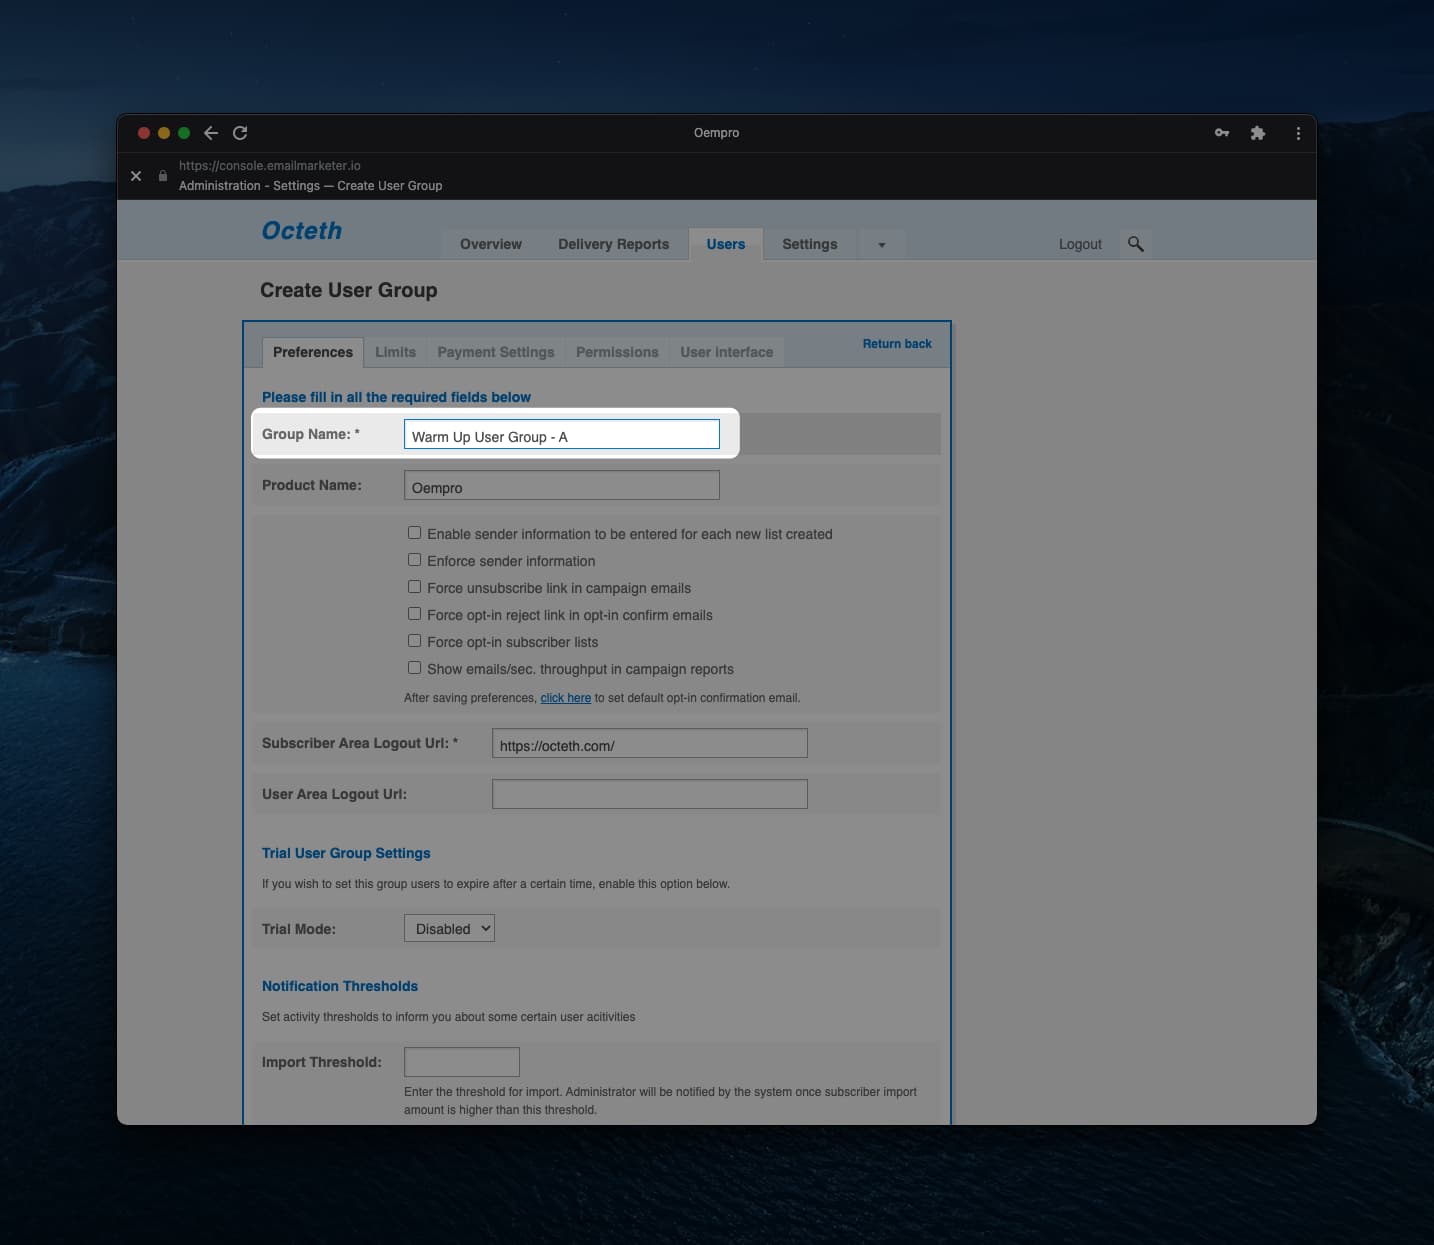
Go to [Users] > [User Groups] and create a new user group.
Set user group group features (permissions, limits, features, etc.) in anyway you prefer. The only thing you need to do is to choose the right delivery server.
Under “Preferences” tab, scroll down to the bottom of the page and choose the corresponding warm-up delivery server you have just created:
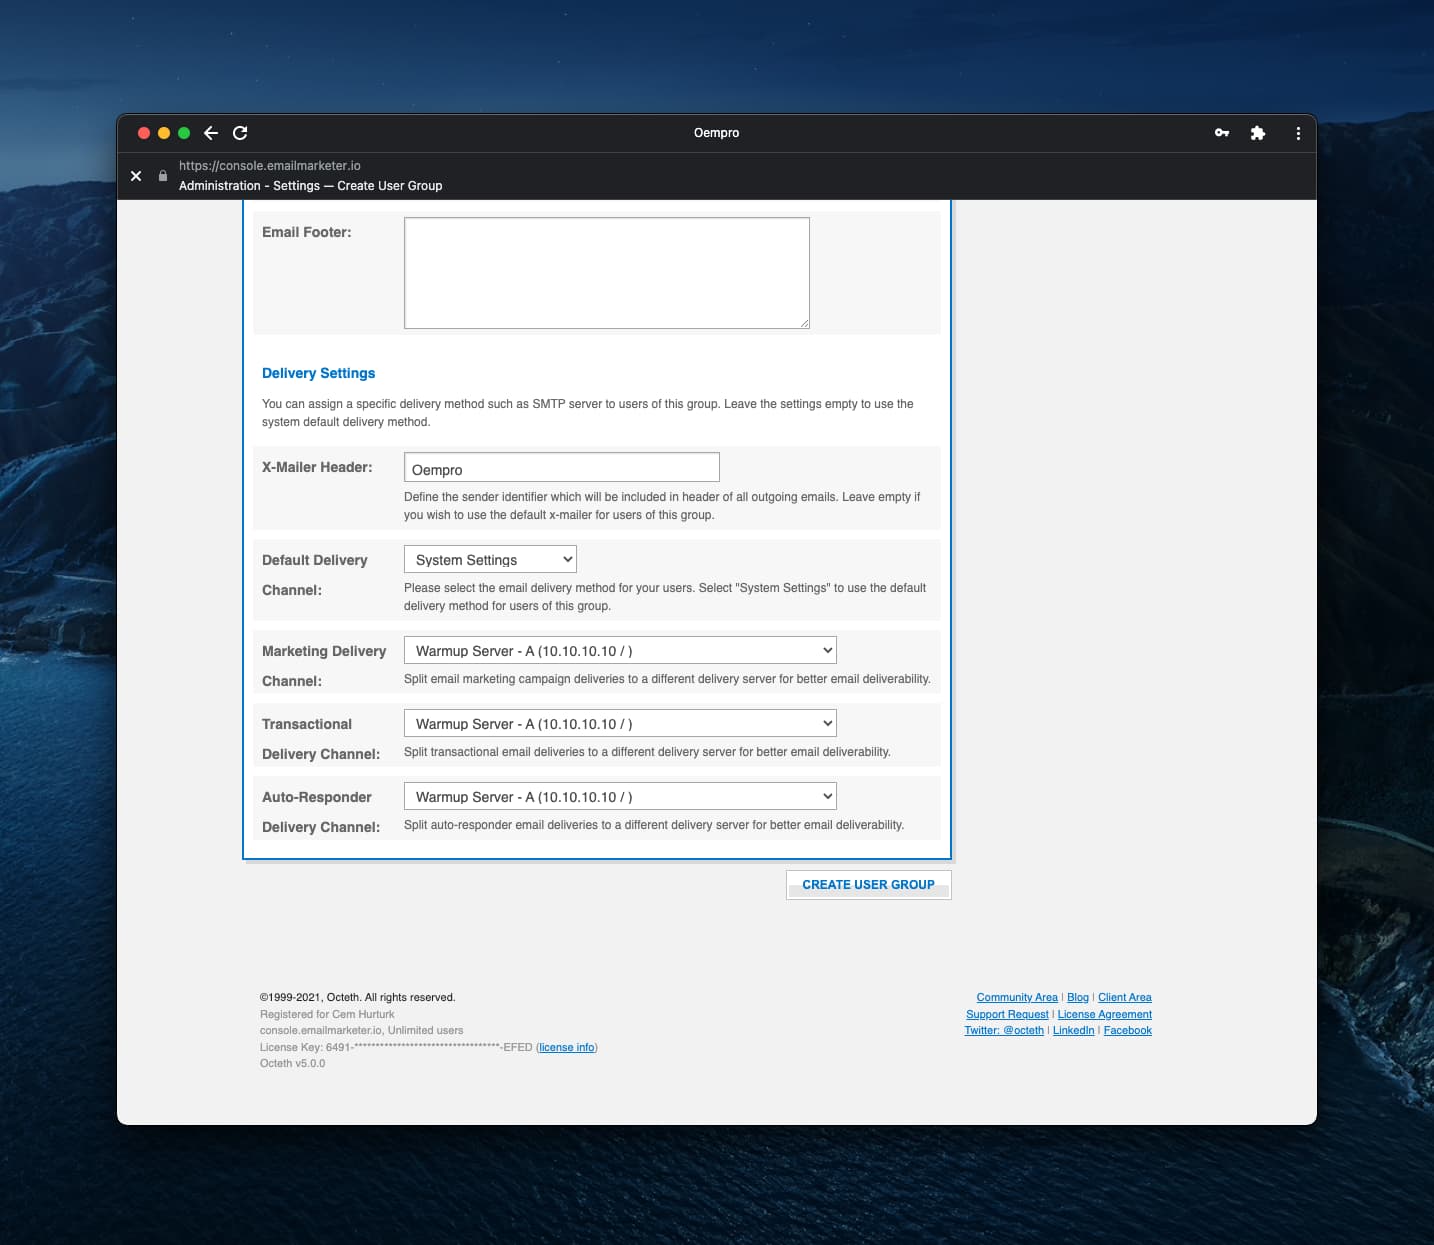
It’s very important to choose the correct delivery server for “Marketing”, “Transactional” and “Auto Responder” delivery channels.
Repeat this step for each warm up delivery server you have created.
Do not forget to name your user groups properly to easily identify them in the future:
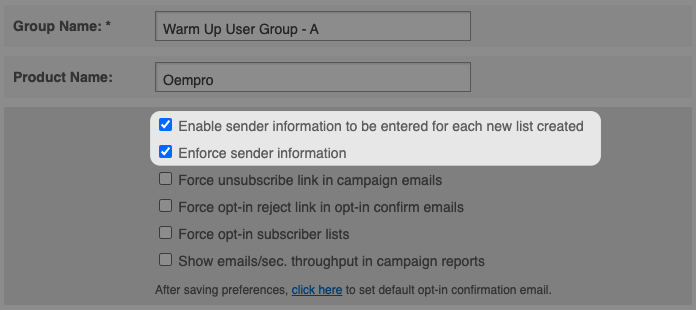
Before creating the new user group, make sure that the following two options are checked:
So far, we have created delivery servers for each sender domain and/or IP address we want to warm up and then we assigned these delivery servers to separate user groups.
In the next step, we will create separate user accounts for each user group we have created.
Setting up user accounts
In the Oempro Administrator Area, go to [Users] section and click “Create User” button.
Fill-in user information and choose the correct user group to assign the user:
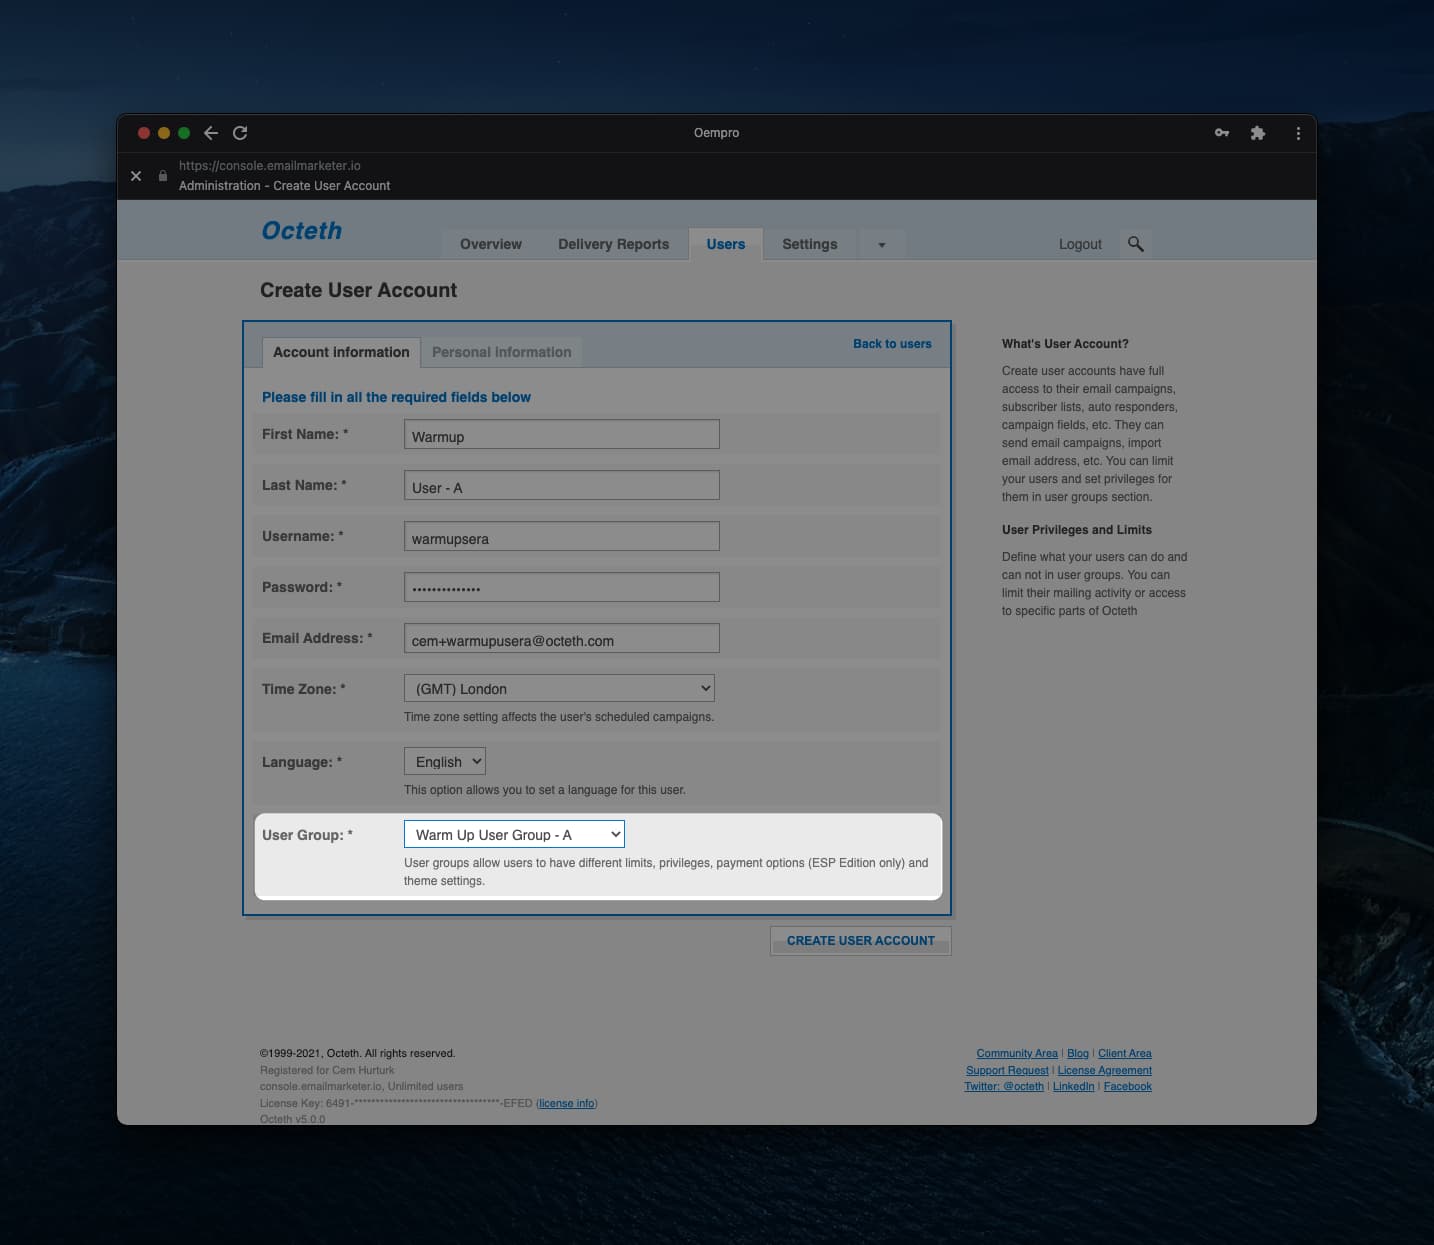
I strongly recommend you to name your “warm up user accounts” properly to identify them at a quick look in the future. For example, “Warm Up User A”, “Warm Up User B”, “Warm Up User B”.
Repeat this process for each user group you have created.
Congratulations! You have just setup your delivery servers, user groups and user accounts. Now you are ready to login to each user account and start setting up lists and the warm-up process.
Setting up lists and auto responders
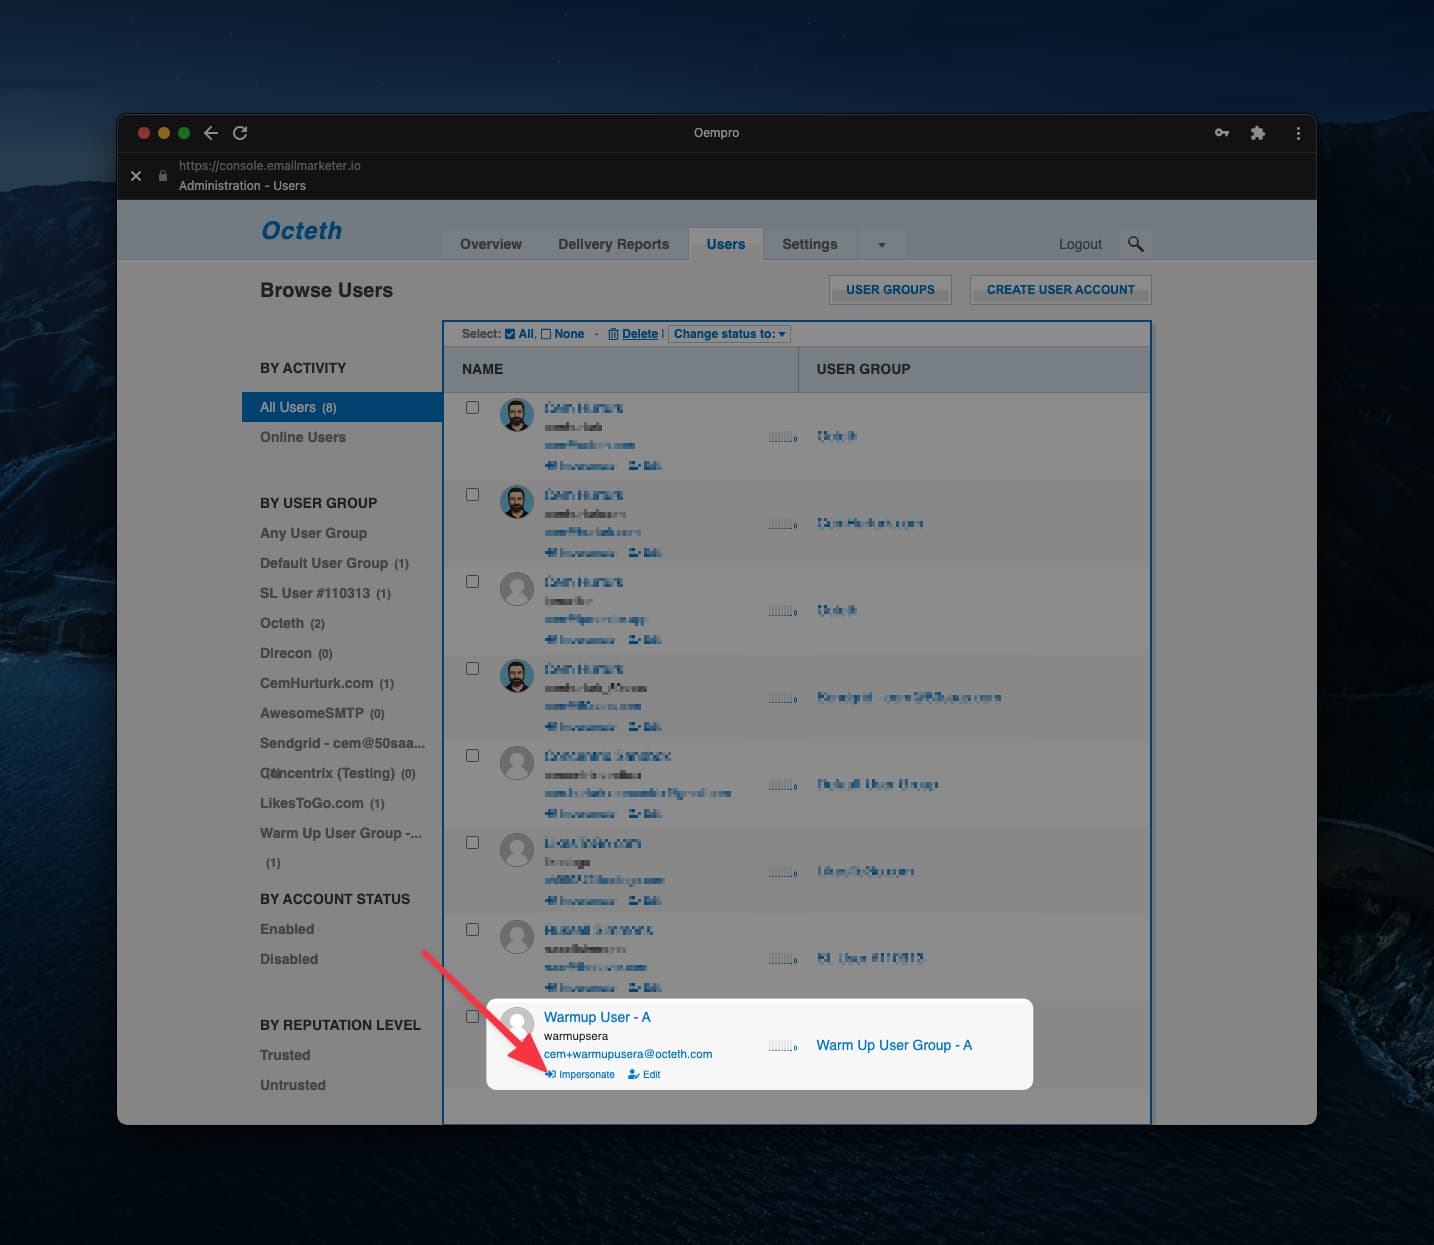
Impersonate to the first warm up user account:
Go to the “Lists” section and create a new list:

When creating your new list, there are a few important points you need to remember.
First of all, please name your list properly, such as “Warm Up List”. The purpose of list is only for warming up your sender domain and IP address. Therefore, it shouldn’t be used for your other campaigns.
- Please enter the email address you would like to warm up to the
Sender Emailfield. - Choose
No confirmation requiredoption for theSubscription Type.
Click the “Create List” button and create your warm up list.
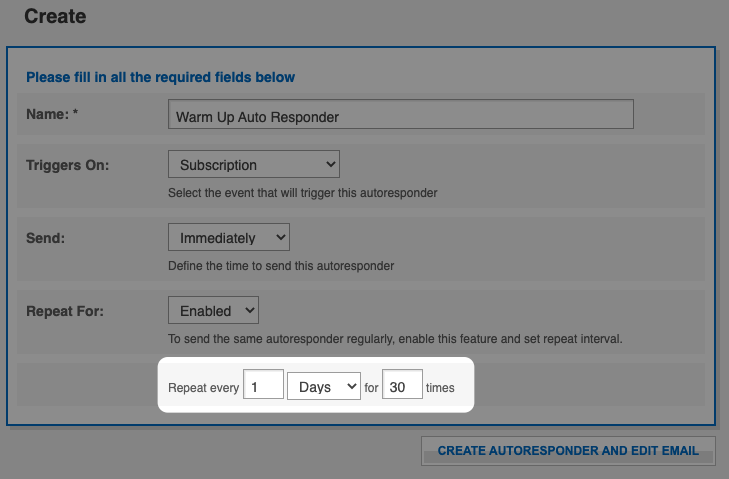
On the list dashboard, click “Autoresponders” link on the left side menu. In this step, we will create a repeating autoresponder.
Repeating autoresponder is an email that can be sent to the recipient at regular time intervals. For example, a repeating autoresponder can be set to be sent every day for the next 14 days.
Create the autoresponder which will be sent to your audience. Make sure that the “Repeating” feature is enabled for the autoresponder:
Here’s the tricky part. I am sure you will not want to send the same email content to your subscribers every day. Therefore, you can leverage Oempro’s “Remote Content” feature and fetch dynamic content from a content source (ex: your blog) every day for your audience. This feature will make sure that you send unique content to your audience every day and best of all, it doesn’t need your interaction. 100% automated.
Subscription webhook setup
In this step, we will create a webhook for the warm up list we have just created. In this way, we can inject our active audience into our warm up list at regular intervals.
In the warm up user account, click “Settings” and go to “Webhooks” section:
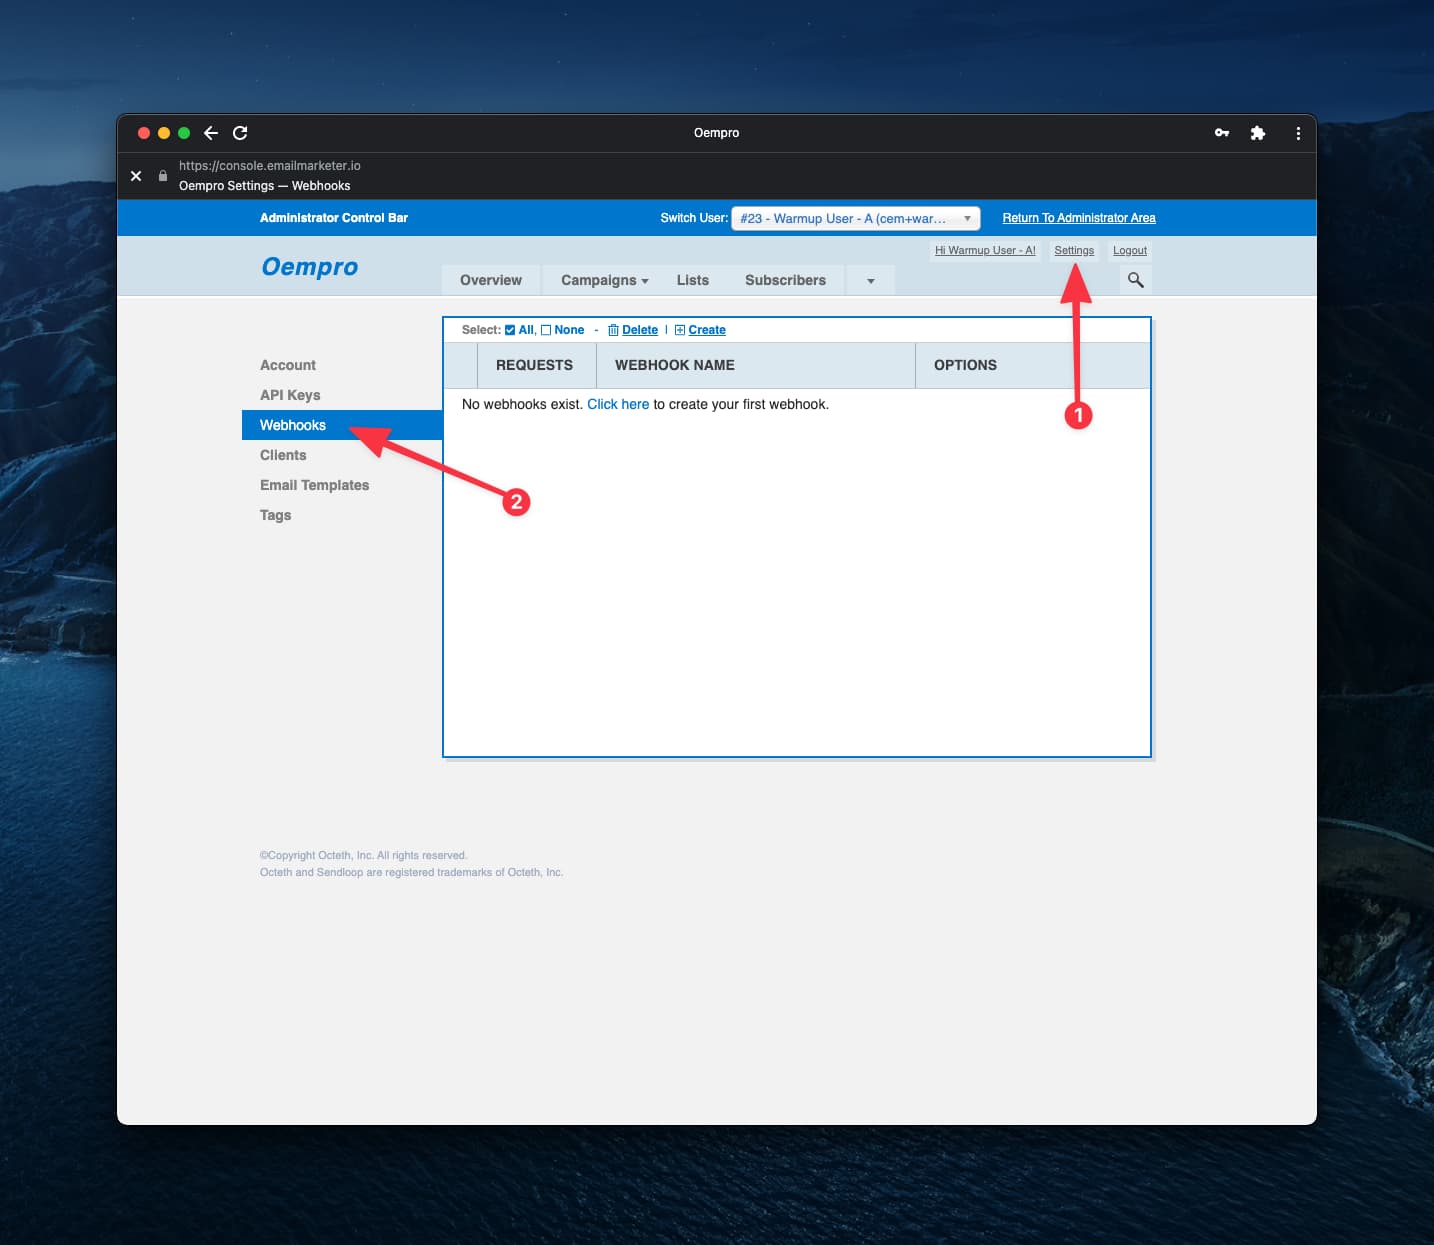
Create a new webhook:

Make sure that you have chosen Subscription event type and assigned the warm up list to the webhook.
Once the webhook is created, click “Instructions” tab and scroll down. You will see the webhook URL:
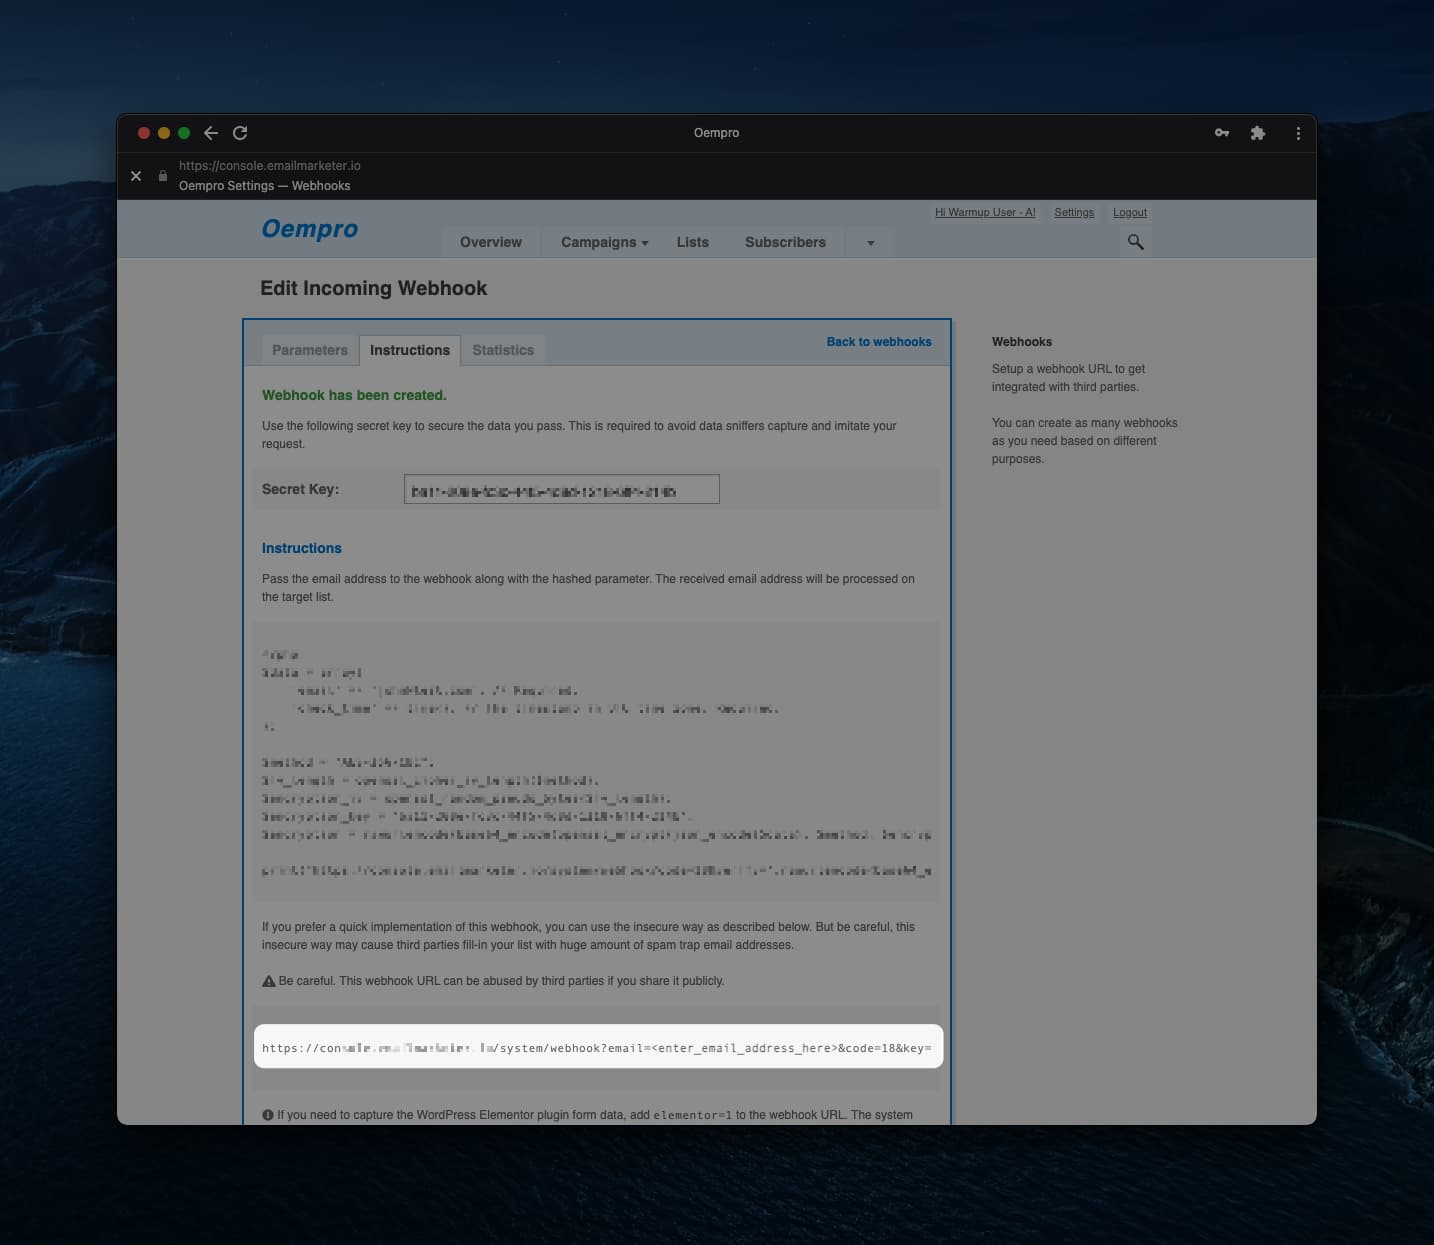
Copy the webhook URL. You will use this webhook URL to inject the audience into the warm-up list.
Well, we are ready to start warming up our sender domain and IP address. In the next step, we will start injecting our active audience members into this list with a plan. This is the critical part.
Injecting active audience
We have just built a perfectly designed warm-up system for our sender domain and IP address. In this way, we will start using it.
The warm-up process is very important. It needs patience, and most importantly a plan which you will stick to it.
There are a few important points you need to keep in mind:
- We will use our active audience to warm up our system. Therefore, please make sure that;
- You have already segmented and identified your audience who have clicked (or opened) at least one email in the last 60 days
- Make sure that you have used a list verification service (ex: Cleanify.io, Kickbox, ZeroBounce, etc.) to get rid of hard bounces, risky emails, role-based email addresses,
- The audience must be injected into the warm-up list over time. Therefore, you must have a warm-up plan.
The warm up process can be planned and adjusted based on your goals. For example, if you would like to deliver only a few thousands of emails a day, you can follow a more risk-free warm-up plan.
If you are looking for a way to send hundred thousands of emails a day, you can be more aggressive with your warm up plan and accept potential risks.
Below, you can find a 30-day warm-up plan for a sender who would like to send a few ten thousand emails every day.
| 10% | 10% | ||||
|---|---|---|---|---|---|
| Days | New Subscriber | Existing Subscriber | Total AR Sent | Est. Opens | Est. Clicks |
| 1 | 100 | 0 | 100 | 10 | 1 |
| 2 | 200 | 100 | 300 | 30 | 3 |
| 3 | 300 | 300 | 600 | 60 | 6 |
| 4 | 400 | 600 | 1000 | 100 | 10 |
| 5 | 500 | 1000 | 1500 | 150 | 15 |
| 6 | 500 | 1500 | 2000 | 200 | 20 |
| 7 | 500 | 2000 | 2500 | 250 | 25 |
| 8 | 500 | 2500 | 3000 | 300 | 30 |
| 9 | 500 | 3000 | 3500 | 350 | 35 |
| 10 | 500 | 3500 | 4000 | 400 | 40 |
| 11 | 500 | 4000 | 4500 | 450 | 45 |
| 12 | 500 | 4500 | 5000 | 500 | 50 |
| 13 | 500 | 5000 | 5500 | 550 | 55 |
| 14 | 500 | 5500 | 6000 | 600 | 60 |
| 15 | 500 | 6000 | 6500 | 650 | 65 |
| 16 | 500 | 6500 | 7000 | 700 | 70 |
| 17 | 500 | 7000 | 7500 | 750 | 75 |
| 18 | 500 | 7500 | 8000 | 800 | 80 |
| 19 | 500 | 8000 | 8500 | 850 | 85 |
| 20 | 500 | 8500 | 9000 | 900 | 90 |
| 21 | 500 | 9000 | 9500 | 950 | 95 |
| 22 | 500 | 9500 | 10000 | 1000 | 100 |
| 23 | 500 | 10000 | 10500 | 1050 | 105 |
| 24 | 500 | 10500 | 11000 | 1100 | 110 |
| 25 | 500 | 11000 | 11500 | 1150 | 115 |
| 26 | 500 | 11500 | 12000 | 1200 | 120 |
| 27 | 500 | 12000 | 12500 | 1250 | 125 |
| 28 | 500 | 12500 | 13000 | 1300 | 130 |
| 29 | 500 | 13000 | 13500 | 1350 | 135 |
| 30 | 500 | 13500 | 14000 | 1400 | 140 |
The warm-up process must be separately planned for each major ISP your audience members use. For example, if the #1 ISP is gmail.com, #2 ISP is yahoo.com, you must prepare separate warm-up plans for each audience.
The success and duration of your warm-up process highly depends on;
- Spam trap hits
- Number of hard bounces
- Number of opt-outs
- Number of spam complaints
- Reactions to your emails (opens > replies > clicks)
Conclusion
In the warm up game, there’s no 2 + 2 = 4 rule. The warm up strategy that works for a marketer may not work for another marketer. Your audience dynamics, and many other factors play a very important role in the warm up game.
But no matter what, do not use third party so-called warm up services. They may generate short term results but as you know, email deliverability is a long term game, not a short term one.
In this article, I explained how to run a warm-up process using multi-user account with a repeating autoresponder. But the warm up process can also be built on a single user account by using “Global Segments” feature, dynamic delivery server re-routing and multiple one-time autoresponders.
Good luck with your warm up process. For any questions or comments, feel free to comment below. I will be happy to read and share my thoughts.