This article will teach you how to create a repeating email campaign that gets automatically created and sent to your target audience at certain time intervals.
This article is useful if you are interested in;
- Creating a repeating and evergreen email campaign for your target audience
- Automating the email content curation process
We will be going through;
- Step 1: Creating a subscriber list
- Step 2: Creating a trailing segment
- Step 3: Preparing the email HTML code for remote RSS contents
- Step 4: Creating the repeating email campaign
- Step 5: Scheduling the email campaign
Step 1: Creating a subscriber list
You can use your existing subscriber list(s) or create a new one specifically for your repeating RSS email campaigns.
Login to your user account and create the subscriber list you would like to use. There’s no special setup for your lists to run repeating RSS email campaigns.
Step 2: Creating a trailing segment
What’s the trailing segment?
Trailing segment is a combination of segment rules which picks subscribers based on dynamic conditions. For example, a regular segment can be a set of rules such as;
- Email Address [contains] “@gmail.com”
This segment will fetch all subscribers who have gmail.com email addresses.
Here’s an example of a trailing segment:
- Subscription date “is older than” 14 days
This rule will pick subscribers who have subscribed in the last 14 days only. You can even make it more specific, such as;
- Subscription date is “yesterday”
You can run your repeating RSS email campaigns for your entire subscriber list or for a specific group of people only.
Step 3: Preparing the email HTML code for remote RSS contents
Once your target audience is ready, the next step is preparing your email HTML code for remote RSS content.
To let Oempro fetch remote content and embed it into your email content, some special merge tags must be added to your HTML code. Below, you can see the list of these special merge tags:
-
%RSS:[url]:[no. of items to fetch]%
This is the RSS content opening tag. Place this merge tag to the beginning of the repeating block. [url] is the RSS source URL. [no. of items to fetch] is the number of items to fetch from the source. -
%RSS:TITLE:[length]%
The title of each RSS entry. You can limit the title by setting a [length]. -
%RSS:CONTENT:[length]%
The RSS entry content. You can limit the content by setting a [length]. -
%RSS:POST-LINK%
This is the direct link to the RSS entry. Example: Blog post link. -
%RSS:COMMENTS-LINK%
This is the direct link to the RSS entry comments area. -
%RSS:PUBLISH-DATE%
RSS content publish date. -
%RSS:AUTHOR%
The author of the RSS content. -
%RSS:END%
This is the closing merge tag. It must be placed at the end of the repeating block.
You can place multiple RSS content sources into your email content. For example, you can embed the last 5 blog post entries into your email content, in the meantime, you can also embed the latest products added to your e-commerce website.
You have full control on the part of the email you would like to turn into remote RSS content source. For example, below, you can see a simple HTML email code:
<!DOCTYPE html PUBLIC "-//W3C//DTD XHTML 1.0 Strict//EN" "http://www.w3.org/TR/xhtml1/DTD/xhtml1-strict.dtd">

<html xmlns="http://www.w3.org/1999/xhtml">
<head>
	<meta http-equiv="Content-Type" content="text/html; charset=utf-8" />
	<meta name="viewport" content="width=device-width, initial-scale=1.0"/>
	<title>Your Message Subject or Title</title>
	<style type="text/css">
		/* ..... */
	</style>
</head>
<body>
	<table cellpadding="0" cellspacing="0" border="5" id="backgroundTable">
	<tr>
		<td>
		<table cellpadding="0" cellspacing="0" border="0" align="center">
			<tr>
				<td width="600" valign="top">
					<h1>This is the email headline</h1>
					<p>This is the email content</p>
					<h2>Latest Blog Posts:</h2>
					<ul>
						<!-- This is the beginning of the RSS repeating block -->
						<li>
							<a href="#" target="_blank">Blog Post #1</a><br>
							Written by ..... on ......<br>
							This is the post content<br>
							<a href="#" target="_blank">Read more</a>
						</li>
						<!-- This is the end of the RSS repeating block -->
					</ul>
				</td>
			</tr>
		</table>
		</td>
	</tr>
	</table>
</body>
</html>
As you can see in the above example, the blog post entries will be embedded into the list <li> block. Here’s the copy of this example with RSS tags placed:
<!DOCTYPE html PUBLIC "-//W3C//DTD XHTML 1.0 Strict//EN" "http://www.w3.org/TR/xhtml1/DTD/xhtml1-strict.dtd">

<html xmlns="http://www.w3.org/1999/xhtml">
<head>
	<meta http-equiv="Content-Type" content="text/html; charset=utf-8" />
	<meta name="viewport" content="width=device-width, initial-scale=1.0"/>
	<title>Your Message Subject or Title</title>
	<style type="text/css">
		/* ..... */
	</style>
</head>
<body>
	<table cellpadding="0" cellspacing="0" border="5" id="backgroundTable">
	<tr>
		<td>
		<table cellpadding="0" cellspacing="0" border="0" align="center">
			<tr>
				<td width="600" valign="top">
					<h1>This is the email headline</h1>
					<p>This is the email content</p>
					<h2>Latest Blog Posts:</h2>
					<ul>
						<!-- This is the beginning of the RSS repeating block -->
						%RSS:https://mytestblog.com/feed:3%
						<li>
							<a href="%RSS:POST-LINK%" target="_blank">%RSS:TITLE:250%</a><br>
							Written by %RSS:AUTHOR% on %RSS:PUBLISH-DATE%<br>
							%RSS:CONTENT:1000%<br>
							<a href="%RSS:POST-LINK%" target="_blank">Read more</a>
						</li>
						%RSS:END%
						<!-- This is the end of the RSS repeating block -->
					</ul>
				</td>
			</tr>
		</table>
		</td>
	</tr>
	</table>
</body>
</html>
Step 4: Creating the repeating email campaign
Once you have your email HTML code ready, it’s time to create your email campaign. Please follow standard procedure creating your email campaign including choosing the target audience, setting the pre-header text, sender information, and email content.
Once you are done with setting up your email campaign, save it.
Step 5: Scheduling the email campaign
The purpose of this article is to create an evergreen email campaign that will be sent to your target audience at certain time intervals. In this way, without your interaction, your audience can be notified about the latest blog posts, the latest products added to the stock, etc.
Therefore, you need to choose Repeatedly as the schedule type for your campaign:
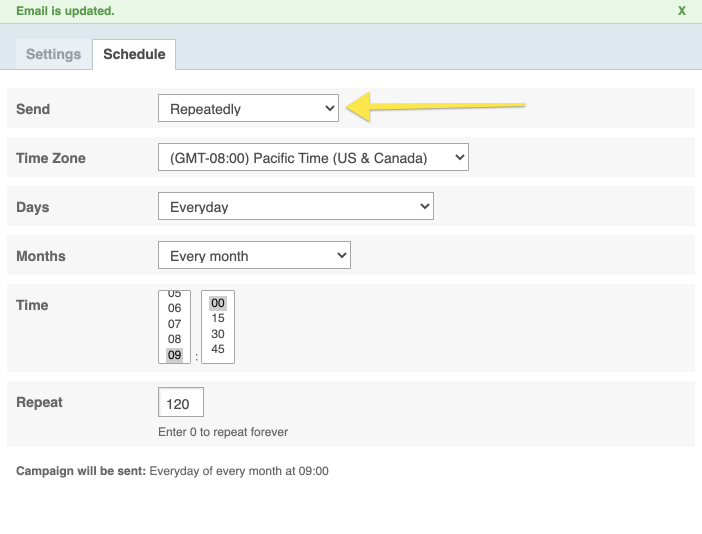
If you want to send your campaign every morning at 9 am, simply choose “Every day” and “Every month” for “Days” and “Months” options. Set the time to be sent. In the above screenshot, you can see that the campaign has been scheduled to run every day at 9 am for the next 120 days.