In this article, I will show you a step-by-step API sequence for;
- Importing the target audience for your email campaign
- Creating an email campaign for the new audience
- Setting up the email content
- Scheduling it for delivery.
Getting Started
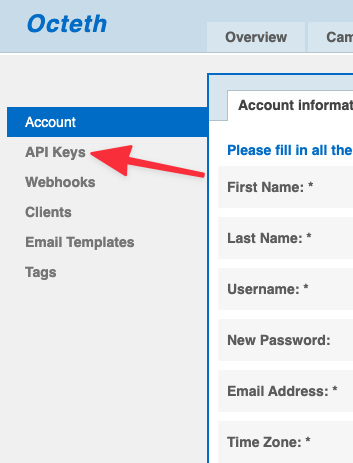
Make sure that you have the API key for the target Oempro user account you are going to execute these API calls. To generate an API call for a specific user, login (or impersonate in the admin area) to the target user account and click “Settings” on the top-right menu:

Click “API Keys” on the left side menu:
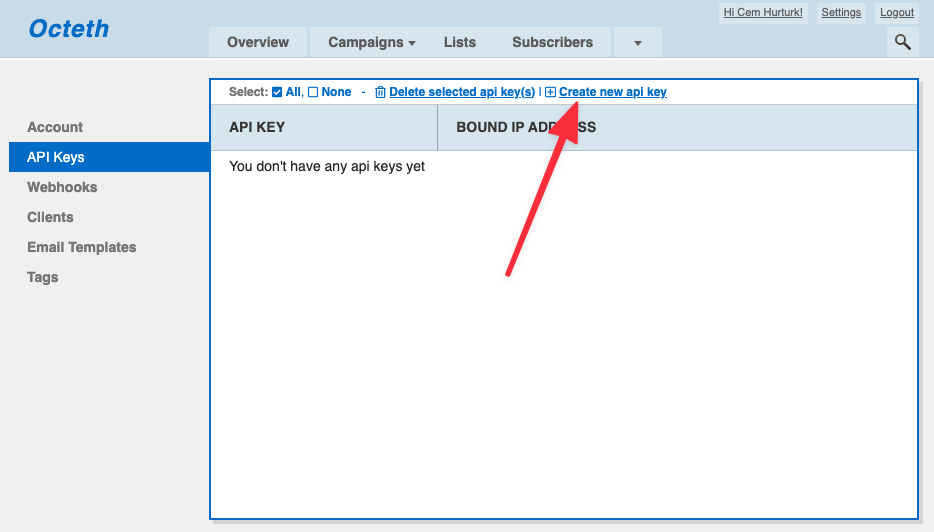
Click “Create new API key” link:
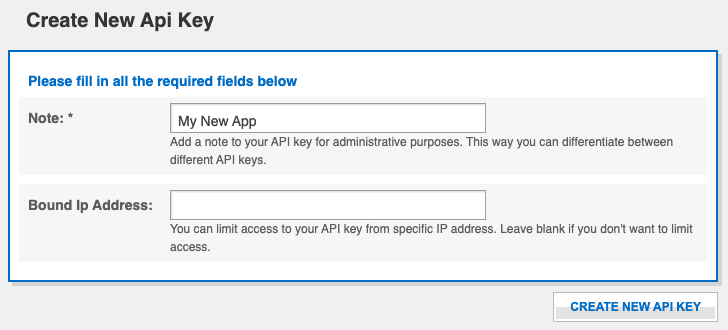
Enter a descriptive note for your API key. If you want to restrict access to the API using this key, enter the IP address. Otherwise, leave the IP restriction field empty.
Oempro will generate a unique API key for the user. This API key will be used to execute API commands by the user:
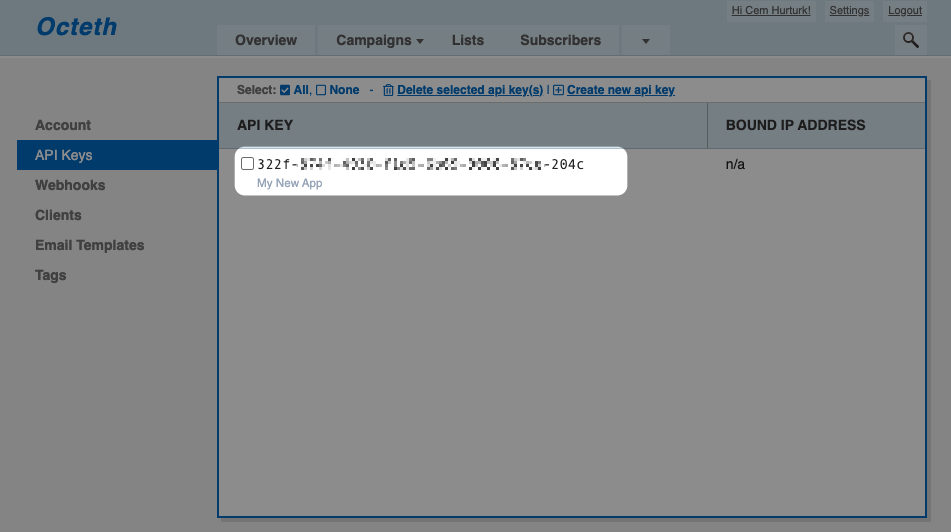
IMPORTANT: Please secure your API key and do not share publicly. Third parties can access to your lists, email campaigns, and data by using this API key. Make sure that it’s secured and not visible in your integrations.
Step 1: Creating a List
<?php

$curl = curl_init();

curl_setopt_array($curl, array(
  CURLOPT_URL => 'http://myoemprodomain.com/api.php',
  CURLOPT_RETURNTRANSFER => true,
  CURLOPT_ENCODING => '',
  CURLOPT_MAXREDIRS => 10,
  CURLOPT_TIMEOUT => 0,
  CURLOPT_FOLLOWLOCATION => true,
  CURLOPT_HTTP_VERSION => CURL_HTTP_VERSION_1_1,
  CURLOPT_CUSTOMREQUEST => 'POST',
  CURLOPT_POSTFIELDS => array(
    'ResponseFormat' => 'JSON',
    'Command' => 'List.Create',
    'APIKey' => '************',
    'SubscriberListName' => 'Test List - 3'),
));

$response = curl_exec($curl);

curl_close($curl);
Here’s an example success response:
{
    "Success": true,
    "ErrorCode": 0,
    "ErrorText": "",
    "ListID": 631
}
And here’s an example failure response:
{
    "Success": false,
    "ErrorCode": [
        2
    ]
}
Error #2 means another list with the same name already exists in the target user account.
Once this API call is executed and the list created, we will store the ListID for future API executions. In this example, it’s 631.
Step 2: Importing the target audience
In this step, we will upload our target audience in CSV format via API. For this purpose, we will execute the Subscriber.Import API end-point.
The subscriber import process consists of two steps. In the first step, you simply pass the target audience to the Subscriber.Import API end-point and in the second step, you map the fields and start the import process.
Import Process Step 1:
<?php

$curl = curl_init();

curl_setopt_array($curl, array(
  CURLOPT_URL => 'http://myoemprodomain/api.php',
  CURLOPT_RETURNTRANSFER => true,
  CURLOPT_ENCODING => '',
  CURLOPT_MAXREDIRS => 10,
  CURLOPT_TIMEOUT => 0,
  CURLOPT_FOLLOWLOCATION => true,
  CURLOPT_HTTP_VERSION => CURL_HTTP_VERSION_1_1,
  CURLOPT_CUSTOMREQUEST => 'POST',
  CURLOPT_POSTFIELDS => array(
    'ResponseFormat' => 'JSON',
    'Command' => 'Subscribers.Import',
    'APIKey' => '************',
    'ListID' => '631',
    'ImportStep' => '1',
    'ImportType' => 'Copy',
    'ImportData' => '[email protected],FirstName1,LastName2
[email protected],FirstName2,LastName2
[email protected],FirstName3,LastName3',
    'FieldTerminator' => ',',
    'FieldEncloser' => '',
    'AddToGlobalSuppressionList' => 'false',
    'AddToSuppressionList' => 'false'
    ),
));

$response = curl_exec($curl);

curl_close($curl);
Here’s an example success response:
{
    "Success": true,
    "ErrorCode": 0,
    "ErrorText": "",
    "ImportID": 1071,
    "ImportFields": {
        "FIELD1": "[email protected]",
        "FIELD2": "FirstName1",
        "FIELD3": "LastName2"
    }
}
As you can see above, we have ImportID and ImportFields response parameters.
ImportID is required for the import API call step 2 and ImportFields is used for custom field mapping.
Import Process Step 2:
In this step, we will simply map CSV data fields with corresponding Oempro custom fields and start the import process.
<?php

$curl = curl_init();

curl_setopt_array($curl, array(
  CURLOPT_URL => 'http://localhost/api.php',
  CURLOPT_RETURNTRANSFER => true,
  CURLOPT_ENCODING => '',
  CURLOPT_MAXREDIRS => 10,
  CURLOPT_TIMEOUT => 0,
  CURLOPT_FOLLOWLOCATION => true,
  CURLOPT_HTTP_VERSION => CURL_HTTP_VERSION_1_1,
  CURLOPT_CUSTOMREQUEST => 'POST',
  CURLOPT_POSTFIELDS => array(
    'ResponseFormat' => 'JSON',
    'Command' => 'Subscribers.Import',
    'APIKey' => '************',
    'ListID' => '631',
    'ImportStep' => '2',
    'ImportID' => '1071',
    'MappedFields[FIELD1]' => 'EmailAddress'
  ),
));

$response = curl_exec($curl);

curl_close($curl);
Here’s an example success response:
{
    "Success": true,
    "ErrorCode": 0,
    "ImportID": "1073",
    "TotalData": 3,
    "TotalImported": 0,
    "TotalDuplicates": 0,
    "TotalFailed": 0,
    "TotalLimited": 0
}
Since the import process is an asynchronous backend process, TotalImported, TotalDuplicates, TotalFailed, TotalLimited response parameters will always be zero.
Step 3: Creating an email campaign
In previous steps, we have created a new list and imported our target audience into that list. Now, it’s time to create the email campaign.
<?php

$curl = curl_init();

curl_setopt_array($curl, array(
  CURLOPT_URL => 'http://localhost/api.php',
  CURLOPT_RETURNTRANSFER => true,
  CURLOPT_ENCODING => '',
  CURLOPT_MAXREDIRS => 10,
  CURLOPT_TIMEOUT => 0,
  CURLOPT_FOLLOWLOCATION => true,
  CURLOPT_HTTP_VERSION => CURL_HTTP_VERSION_1_1,
  CURLOPT_CUSTOMREQUEST => 'POST',
  CURLOPT_POSTFIELDS => array(
    'ResponseFormat' => 'JSON',
    'Command' => 'Campaign.Create',
    'APIKey' => '************',
    'CampaignName' => 'My First Email Campaign'
  ),
));

$response = curl_exec($curl);

curl_close($curl);
Here’s an example success response:
{
    "Success": true,
    "ErrorCode": 0,
    "CampaignID": 9745
}
The CampaignID response parameter is required for creating the email content and scheduling campaign in following steps.
Step 4: Creating the email content
In this step, we will create the email content of the campaign.
The first thing that needs to be done is to create an email asset:
<?php

$curl = curl_init();

curl_setopt_array($curl, array(
  CURLOPT_URL => 'http://localhost/api.php',
  CURLOPT_RETURNTRANSFER => true,
  CURLOPT_ENCODING => '',
  CURLOPT_MAXREDIRS => 10,
  CURLOPT_TIMEOUT => 0,
  CURLOPT_FOLLOWLOCATION => true,
  CURLOPT_HTTP_VERSION => CURL_HTTP_VERSION_1_1,
  CURLOPT_CUSTOMREQUEST => 'POST',
  CURLOPT_POSTFIELDS => array(
    'ResponseFormat' => 'JSON',
    'Command' => 'Email.Create',
    'APIKey' => '************',
));

$response = curl_exec($curl);

curl_close($curl);
This API request will return the following response:
{
    "Success": true,
    "ErrorCode": 0,
    "EmailID": 7023
}
Now, it’s time to set the content of the email. For this, we will use the Email.Update API end-point and update the EmailID received above:
<?php

$curl = curl_init();

curl_setopt_array($curl, array(
  CURLOPT_URL => 'http://localhost/api.php',
  CURLOPT_RETURNTRANSFER => true,
  CURLOPT_ENCODING => '',
  CURLOPT_MAXREDIRS => 10,
  CURLOPT_TIMEOUT => 0,
  CURLOPT_FOLLOWLOCATION => true,
  CURLOPT_HTTP_VERSION => CURL_HTTP_VERSION_1_1,
  CURLOPT_CUSTOMREQUEST => 'POST',
  CURLOPT_POSTFIELDS => array(
    'ResponseFormat' => 'JSON',
    'Command' => 'Email.Update',
    'APIKey' => '************',
    'EmailID' => '7023',
    'Mode' => 'Editor',
    'ValidateScope' => 'Campaign',
    'EmailName' => 'Test Email Content',
    'FromEmail' => '[email protected]',
    'FromName' => 'Test From Name',
    'ReplyToEmail' => '[email protected]',
    'ReplyToName' => 'Test Reply-To Name',
    'Subject' => 'Test email subject'),
    'HTMLContent' => '<html><body><p>This is HTML email body</p></body></html>',
    'PlainContent' => 'This is Plain email body',
    'PreHeaderText' => 'This is pre-header text for HTML emails',
));

$response = curl_exec($curl);

curl_close($curl);
This API request will return the following response:
{
    "Success": true,
    "ErrorCode": 0
}
Now, it’s time to update the campaign and link this email content to the campaign to be sent:
<?php

$curl = curl_init();

curl_setopt_array($curl, array(
  CURLOPT_URL => 'http://localhost/api.php',
  CURLOPT_RETURNTRANSFER => true,
  CURLOPT_ENCODING => '',
  CURLOPT_MAXREDIRS => 10,
  CURLOPT_TIMEOUT => 0,
  CURLOPT_FOLLOWLOCATION => true,
  CURLOPT_HTTP_VERSION => CURL_HTTP_VERSION_1_1,
  CURLOPT_CUSTOMREQUEST => 'POST',
  CURLOPT_POSTFIELDS => array(
    'ResponseFormat' => 'JSON',
    'Command' => 'Campaign.Update',
    'APIKey' => '************',
    'CampaignID' => '9745',
    'RelEmailID' => '7023'
  ),
));

$response = curl_exec($curl);

curl_close($curl);
The API response will be:
{
    "Success": true,
    "ErrorCode": 0
}
Step 5: Scheduling the campaign for delivery
This is the last step. In this step, we will execute Campaign.Update API end-point again and this time, we will set schedule options:
<?php

$curl = curl_init();

curl_setopt_array($curl, array(
  CURLOPT_URL => 'http://localhost/api.php',
  CURLOPT_RETURNTRANSFER => true,
  CURLOPT_ENCODING => '',
  CURLOPT_MAXREDIRS => 10,
  CURLOPT_TIMEOUT => 0,
  CURLOPT_FOLLOWLOCATION => true,
  CURLOPT_HTTP_VERSION => CURL_HTTP_VERSION_1_1,
  CURLOPT_CUSTOMREQUEST => 'POST',
  CURLOPT_POSTFIELDS => array(
    'ResponseFormat' => 'JSON',
    'Command' => 'Campaign.Update',
    'APIKey' => '************',
    'CampaignID' => '9745',
    'ScheduleType' => 'Immediate'
  ),
));

$response = curl_exec($curl);

curl_close($curl);
The API response will be:
{
    "Success": true,
    "ErrorCode": 0
}
Possible ScheduleType API parameter values:
Not Scheduled: Save as draftImmediate: Send as soon as possibleFuture: Send at a future time
–SendDate: YYYY-MM-DD target schedule date
–SendTime: HH:MM:SS target schedule time
–SendTimeZone: This value must be set to(GMT) London